blog
Contact
home
ABOUT
Maternity & Newborn
Family Photography
Photography education
portfolio
Navigate:
Hi I'm Christine!
When you invite me to capture your maternity, newborn, and family experiences, I know you’re sharing your heart with me. Through my photos, I share my heart with you, too.
learn more
Santa Sessions
The First Year Anthology
Most Common Photo Editing Mistake

Hey Photographer… so you’re frustrated and fed up with the editing process, right? You are ready to solve the most common photo editing mistake photographers make. You are ready to finally have the secret sauce. Well, I’ve got it friend! I’m going to tell you how I cracked the code on sun-kissed skin tones and dreamy backgrounds in my photos.

I know you are likely well versed in the basics of Lightroom Classic, and that you have tried out a preset or two (or ten) before. So, why aren’t your photos magically transforming (*ahem* “in one click”) into that signature edit that you are hoping to achieve?
Two things are happening:
- You’re likely applying a preset with little to no instruction on what the preset is doing to your photos. You don’t know how to fine tune those preset adjustments to meet your photo’s needs. Because, come on, not every photo we take is in even light, with clear skin tones, and epic backgrounds. Every session, every client, and every photo has different needs.
- As a portrait photographer we make our clients the priority in our photos. We are often heart centered artists who want to show case people in our work. So, when we edit, why are we not separating our clients’ needs in the photo from the overall photo’s needs? Let me explain..
The most common photo editing mistake is not taking advantage of separating your subject from the background with masks in Lightroom Classic.
Why do we use photo masks
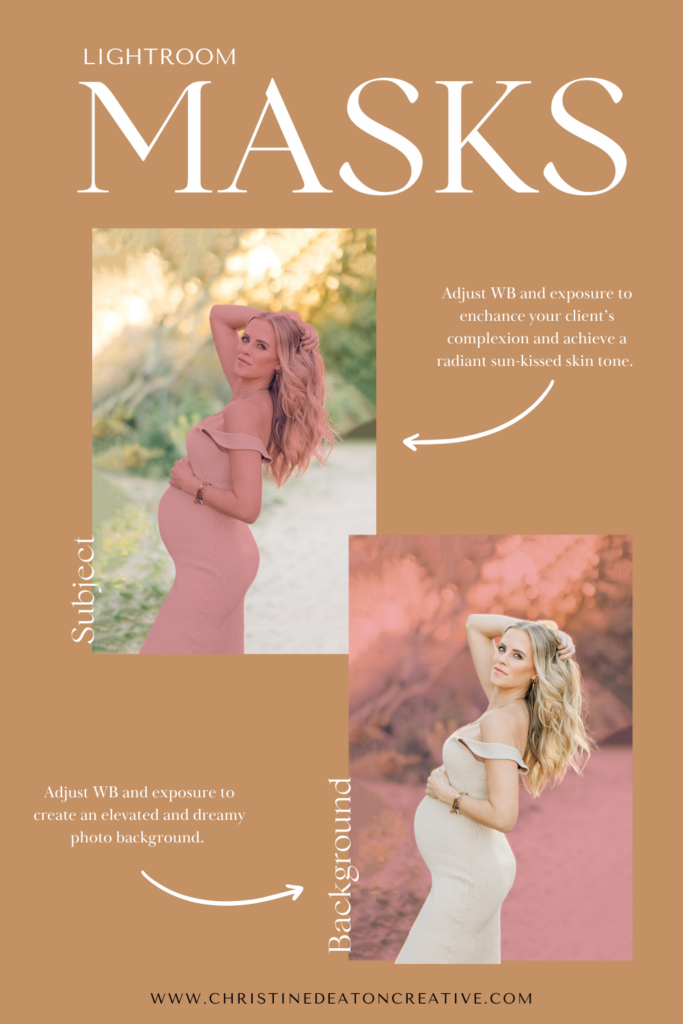
It’s important to use masks so that we can make local adjustments to our client’s (the subject mask) that do not affect the background, and vice versa. We want to make Local Adjustments, not Global Adjustments. Think of it this way… I need to warm up a photo for my client’s skin to reflect the true-to-life sun-kissed skin she had at the beach. But, when I do this the WHOLE photo gets warmer, not just her skin (this is a global adjustment). So, now I have an ocean that’s less of a dreamy cool blue and is more of a warm green blue. We want to fine tune each area of the photo as needed (local adjustments), which is totally possible when we separate those areas of a photo with a mask. Yay!
How do we create a mask for our subject
Adobe has made creating a mask in Lightroom Classic so easy. They know how important it is to have access to local adjustments in the photo editing process. In the fall of 2022, Adobe released its latest version of Lightroom Classic (version 12.0) and introduced new AI-powered masks. The AI can automatically select people, objects, and backgrounds in your photos with just one click. It is also still possible to manually select areas to mask with a brush, radial and linear gradients, and range masks. You can also use the mask amount slider to adjust the power of the masks adjustments all at once.
Here are the steps to create a mask:
- Open a photo to edit in the Develop module (preferably a portrait to select people).
- Select Masking > Select Subject from the tool strip of the Develop module.
- Lightroom Classic will analyze the photo, with AI power, and automatically select the subject for you. You can view the selection as an overlay and a mask is created in the Masks panel.
- You can repeat this process, and Select Background in step 2 to create a mask for the background.
What do we do with the masks in our photos
Now you have a mask for your subjects and a mask for your background. You can click on each individual mask to locally adjust: white balance, exposure, contrast, highlights, shadows, whites, blacks, texture clarity, dehaze, hue, saturation, sharpness, noise, moire, defringe, color, and curve.
This way, you are no longer making global adjustments that wash your entire photo in the same effect, but you are fine tuning each area of your photo to bring it to life in the most beautiful and efficient way possible.

But maybe you’re still thinking… this sounds tricky. How will I know I’m doing it correctly?
I totally get it — written tutorials and reading step-by-step instructions on editing aren’t fun. So I can totally relate to not feeling in the mood to dig deep and reread those instructions to solve your most common photo editing mistake.
Maybe my personal experience can nudge you in the right direction though (that direction being in purchasing my presets and photo editing course, yay! I’ve done all the work to save you time!)
You read that right! I’ve created and am now sharing my personal presets and my streamlined editing workflow with you. Why does this solve your problem? Because my preset is preloaded to create a subject and background mask every time it is applied to your photos! Woohoo! You don’t ever have to think about creating those masks. It’s all done for you. The masks are already loaded with the most common adjustments that I need in my subject mask and my background mask, but my editing course also explains in simple detail how you can make further adjustments to achieve your signature editing style.
Don’t think just because other presets have let you down that this is going to be the same rodeo. I’ve intentionally bundled my presets with an editing course to ensure you know how to fine tune every photo to meet your signature editing needs.
I believe that simply using a preset is not enough; we must understand how the preset is affecting our photos and how we can adjust those settings to achieve the desired results. With my course, you’ll have the knowledge and tools to create truly stunning, eye-catching images every time. Plus, with my editing workflow, you’ll have a clear roadmap to follow so that you can achieve consistent, dreamy edits every time.
Ready for your most common photo editing mistake to be solved?
Head over and enroll for my Presets & Editing Course (*wink* so you can have ALL of my secrets, and edit just like me!).

Leave a Reply Cancel reply
Navigate:
home
Services:
ABOUT
PORTFOLIO
BLOG
CONTACT
MATERNITY & NEWBORN
FAMILY
PHOTOGRAPHER education
Serving Scottsdale, Phoenix, Paradise Valley, Tempe & Mesa
@CHRISTINEDEATONCREATIVE
© 2019-2026 Christine Deaton Creative
terms and conditions
Privacy Policy